Overview
Managing a WordPress website involves more than just creating content—it’s about understanding your audience and optimizing your site’s performance. Google Tag Manager (GTM) offers a powerful solution for tracking user behavior and collecting valuable data. At the same time, WordPress serves as a versatile content management system (CMS) for building and managing websites. In this guide we will explore how integrating GTM with WordPress can streamline website management and enhance analytics capabilities.
What are WordPress and GTM?
WordPress
WordPress is a content management system (CMS) that allows users to create and manage websites easily, offering customizable themes, plugins, and features to build blogs, e-commerce sites, and more without extensive coding knowledge
Google Tag Manager (GTM)
Google Tag Manager is a tool developed by Google that simplifies the process of managing website tags. It allows users to add, edit, and deploy various tracking codes and snippets on their website without needing to modify the site’s code directly. It provides a centralized platform for effectively tracking and analyzing website traffic, conversions, and user behavior.
Integrating WordPress & GTM
WordPress and Google Tag Manager (GTM) can work together to enhance website functionality and analytics capabilities.
By integrating Google Tag Manager with WordPress, users can easily manage and deploy various tracking codes, such as Google Analytics, Facebook Pixel, or custom event tracking, without needing to edit the WordPress theme files directly. This integration streamlines adding and updating tracking codes, allowing for more efficient website tracking and analysis.
Moreover, GTM’s data layer feature can be leveraged within WordPress to capture and pass dynamic data, such as user interactions or specific page information, to various tags and analytics tools, providing deeper insights into user behavior and website performance.
Integration Steps:
To integrate GTM with WordPress effectively, follow these steps:
- Sign Up for Google Tag Manager: If you haven’t already, sign up for a Google Tag Manager account at tagmanager.google.com.
- Create a Google Tag Manager Container: Within your GTM account, create a new container for your WordPress website. A container is a virtual space where you’ll manage all your tags, triggers, and variables.
- Install Google Tag Manager Plugin: In your WordPress dashboard, install and activate a Google Tag Manager plugin. There are several plugins available for this purpose; choose one that suits your needs.
- Configure the Plugin: After installing the plugin, follow the setup instructions provided by the plugin developer. Typically, this involves entering your Google Tag Manager container ID into the plugin settings.
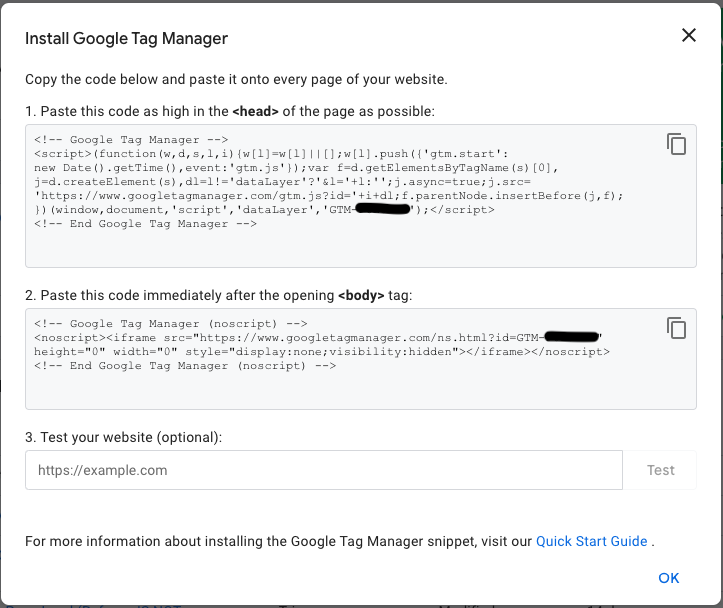
- Implement Google Tag Manager Code: Insert the Google Tag Manager container snippet into your WordPress theme. This typically involves adding the GTM code just after the opening <header> and <body> tags in your HTML. Some plugins handle this step automatically.
- First, you are going to click on your GTM Container ID

- Then, the GTM container snippet will pop up on your screen. It will look like this:
- First, you are going to click on your GTM Container ID
- Publish Changes: Save your changes in both Google Tag Manager and your WordPress dashboard. Make sure to publish the container changes in GTM.
- Test: Test your Google Tag Manager setup to ensure that tags are firing correctly on your WordPress website. You can use GTM’s preview mode to debug and verify that tags fire as expected.
- Select preview for GTM debugger view
- Input a testing URL
- Ensure that the GTM debugger picks up your WordPress pages, any out-of-the-box triggers/tags you have in place, and any custom configuration.
- For example, if you are passing your website information to GA4, then confirm that the GA4 initialization tag has trigger in the debugger view.

- For example, if you are passing your website information to GA4, then confirm that the GA4 initialization tag has trigger in the debugger view.
- Once confirmed, you can navigate back to your GTM container and set the changes live
- Add and Configure Tags: Once the basic integration is complete, you can start adding tags, triggers, and variables within Google Tag Manager to track various user interactions, such as pageviews, form submissions, button clicks, etc.
- Categories and tags within WordPress
- Publish Container Changes: After configuring your tags, triggers, and variables and testing that everything is working correctly, remember to publish your changes in Google Tag Manager to make them live on your WordPress website. *Remember to always fix all your issues first before publishing changes because once they are live, the data can not be undone.
- Monitor and Optimize: Regularly monitor your Google Tag Manager setup to ensure that tags are functioning correctly and capturing the desired data. You can further optimize your tracking strategy based on the insights gathered from GTM reports and analytics tools.
Conclusion
By integrating WordPress with Google Tag Manager, website owners can efficiently manage tracking codes and gain valuable insights into visitor behavior. This streamlined approach to website management empowers users to make data-driven decisions and improve the effectiveness of their online presence.