Salesforce Integration Licenses – save money and improve security
The Salesforce user license dilemma
If you’ve done significant work in the Salesforce-related tech stack over the years, you’ve probably encountered the same Salesforce user being used for multiple integrations: that integrations@yourcompany.com user, with its System Administrator profile, popping up again and again. Or worse, an actual person’s user being leveraged for integrations. Why have organizations done this?
Convenience and cost
We get it! You already have a user handy with the right permissions. Just use that one, close the ticket, and move on to other problems, right? Trying to meet a deadline and move quickly is a common reason people recycle users for integrations.
Aside from convenience, cost is a major factor: standard Salesforce user licenses are expensive. For an enterprise-level organization, that Salesforce user could cost $1200 per year, depending on the specific nature of your Salesforce contract. Having a different user for every integration could balloon into tens of thousands of dollars per year quickly. Fighting for that budget may not be worth the added peace of mind.
Shared user integrations are less secure
Suppose you’re a marketing ops manager at your organization. You knew your user already had all of the access you needed for the Marketo or Hubspot integration, so you went ahead and ignored official documentation, and entered your own user credentials when enabling the sync. Now you’ve added some vulnerabilities:
- Hacking: if your user credentials get compromised, the integration is now compromised too.
- Confusion: an admin trying to troubleshoot a problem in Salesforce can’t easily tell what system is making a change. If you used your own user, they might ping you over Slack to interrogate you about why you’re mass updating records, when it’s actually the integration.
- Permission control: if that user has permissions beyond what the integration requires, you risk a misconfigured integration causing damage to Salesforce data it wasn’t intended to change.
- Turnover and disruption: suppose you leave the company, so a Salesforce admin deactivates your user as part of the offboarding process. Oops! Now all the integrations you connected with your user are broken, and the business is crippled.
Even if your team uses a specific user just for integrations (i.e. integrations@yourcompany.com) and that user is shared across multiple integrations, many of the same risks apply.
What should you do instead?
Salesforce Integration licenses
In 2023, Salesforce decided to address this troubling practice by offering a new type of user license, Salesforce Integration licenses, and offering them in abundance in order to encourage best practices:
Each Salesforce org gets 5 of these user licenses for free! That’s right, FREE, no asterisk. In Salesforce—if you have the required permissions—you can go to Setup > Company Information to see how many user licenses of which type your organization has available. There should be at least 5 of the Salesforce Integration licenses:

Once you’ve used all of those 5 free licenses, you can buy more at a fraction of the cost of a standard Salesforce license: $10/mo (at time of writing).
Integration licenses enable good security practices without incurring unreasonable costs.
Create a new integration user
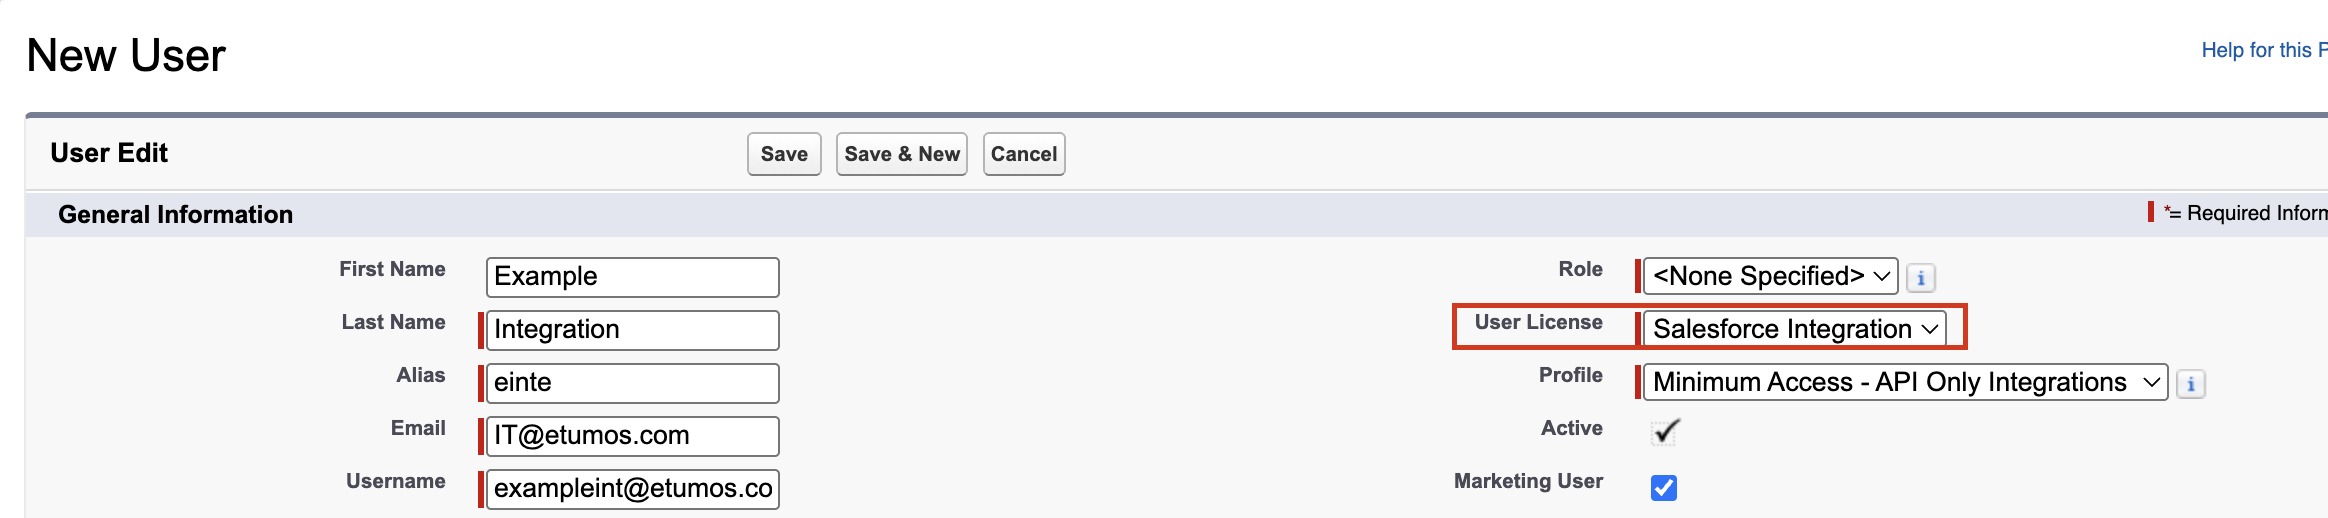
To leverage one of these licenses, create a new user for your integration:
- User License = “Salesforce Integration”
- Profile = “Minimum Access – API Only Integrations”. There’s no need to make a custom profile for your integration. We’ll use a permission set later on to give your integration the permissions it needs.
This is a good time to remember some other important practices:
- The Username must be in the format of an email address, but doesn’t have to be a real email address, and must be unique across all Salesforce orgs. However, the email address doesn’t have to be the same, and can even be changed later. The email address should be an alias or inbox, with limited access, that is unlikely to be deactivated any time soon.
- Remember to check Marketing User if the integration needs to access campaigns and campaign members.
- If your organization uses the role hierarchy to manage record sharing, remember to pick a role that will give the user access to all of the records it needs.
Integration users and Single-Sign On (SSO)
If your organization uses Single Sign-On (SSO) to log into Salesforce, you will need to work with your IT team to set up a login with your SSO provider. Alternatively, if your organization’s security policy allows it, your Salesforce admins can make an exception for integration users to not need SSO, and use standard Salesforce login. Your SSO tool also likely charges by number of users, so don’t take the decision lightly.
Assuming the user doesn’t need to access Salesforce through SSO, use the below instructions to set up the integration user’s password and Multi-Factor Authentication.
Integration User password and MFA: use incognito
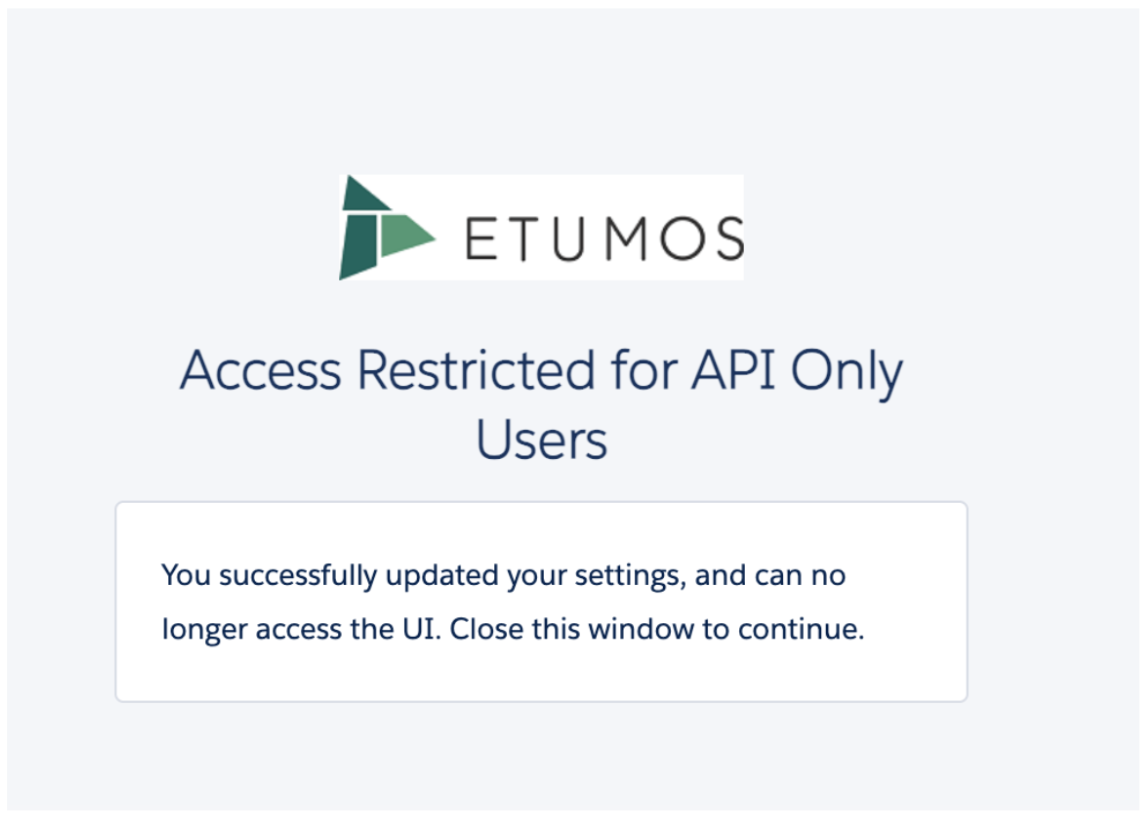
When the notification from Salesforce arrives in that email inbox to set the password, don’t click it! Instead, copy the link, open an incognito window in your browser, and then paste the link there. Remember that this user is API access only – once you’ve set the password and security question, and are now logged in as that user, the only thing you can see is a notice that your user is API Only. You can’t even log out! So unless you want to deal with clearing your browser’s cookies for your Salesforce domain, it’s better to just use an incognito window.
If you happen to be the right Product Manager at Salesforce and you’re reading this, please add a link to Log Out to this screen…
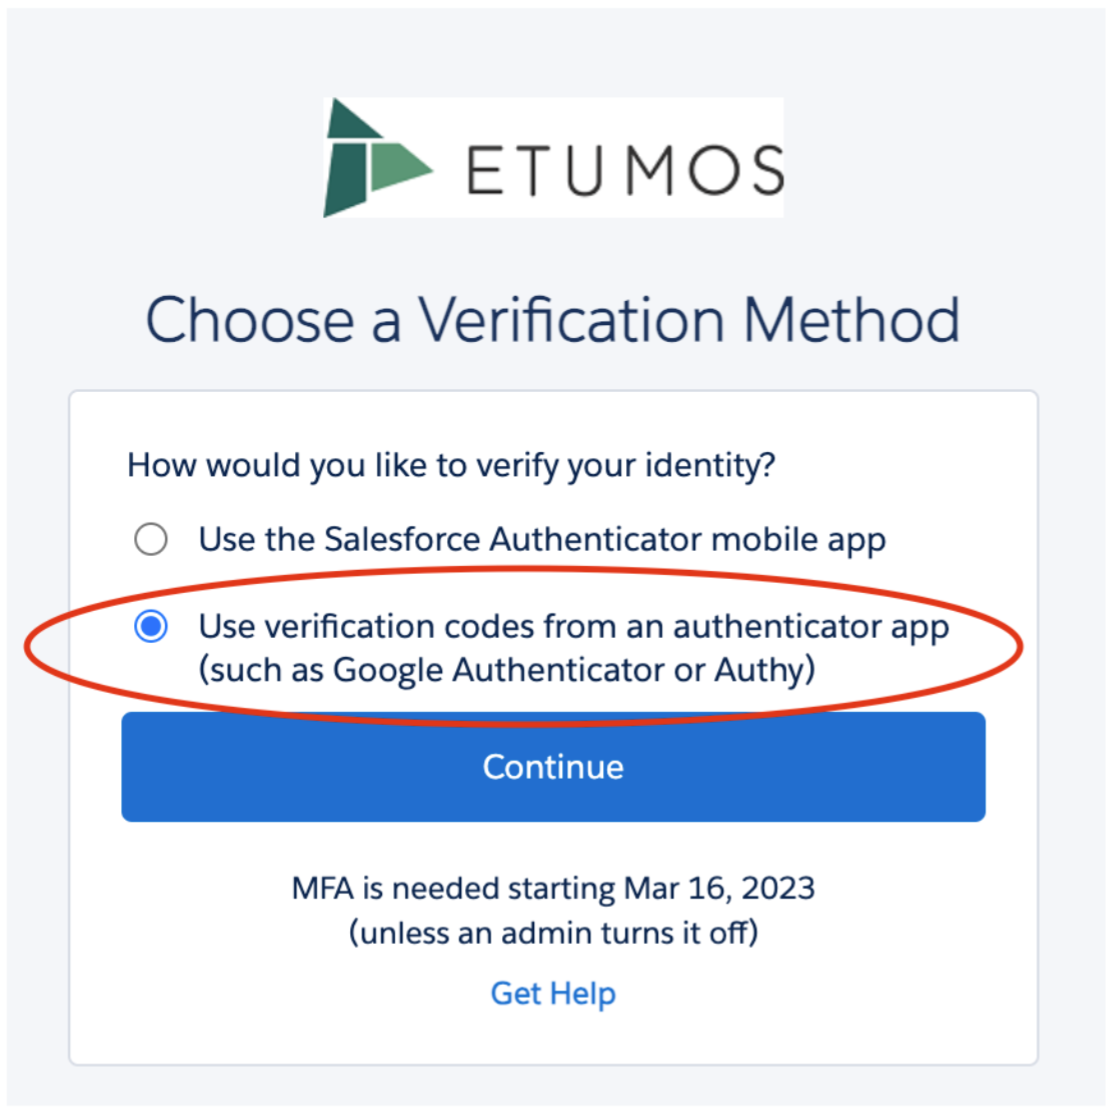
Close the incognito window, and then open another incognito window and go to your organization’s login page. Test the user credentials to make sure they work, and then set up Multi-Factor Authentication (MFA) when prompted. If your organization uses a password manager like 1password to securely share login information, you can use that to manage MFA too!
If your organization doesn’t already have a secure practice for storing and sharing passwords, like a password manager, we highly recommend it. Being able to find that password, and hand it off to a new person when/if you leave your organization, is critical to avoiding system downtime and the associated costs.
You can use the “Choose another verification method” option (see screenshots below) to rely on one-time passcodes from the password manager instead of using the Salesforce Authenticator, Google Authenticator on your phone, etc.
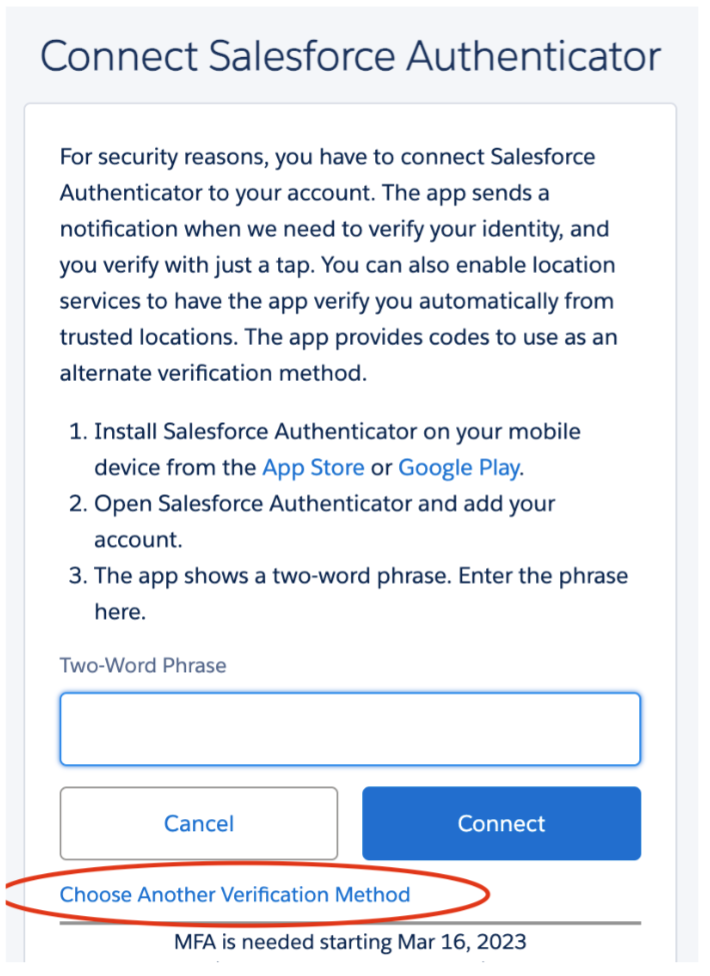
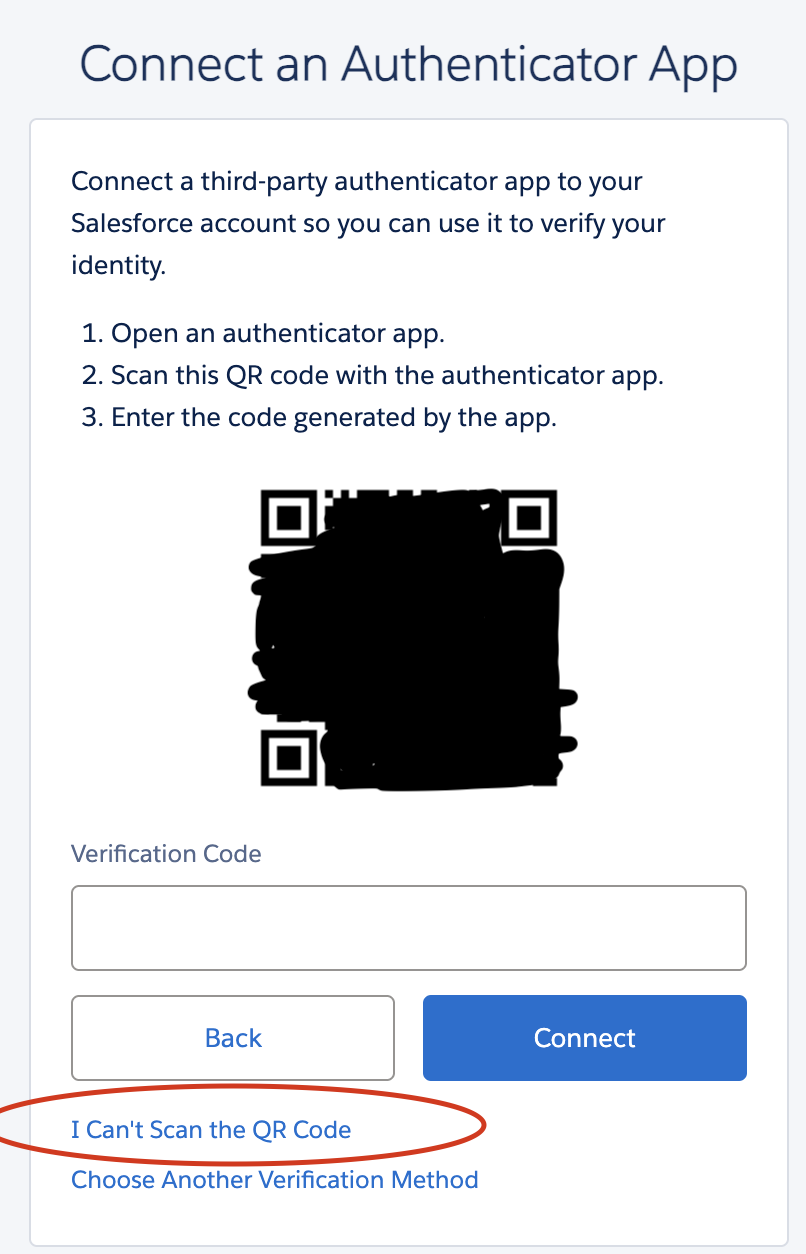
Lastly, click “I can’t Scan the QR Code” to get a key that you can then copy/paste into the One-Time Password option in 1password. Other password managers should have a similar option.
Close the incognito window.
API User Permission Sets
Next, create a new permission set (not a profile!) to give the user the access it needs, per the documentation of the product you’re trying to integrate.
Set the permission set’s license type to Salesforce API Integration. It’s important to set the license type to avoid accidentally giving it permissions that are incompatible with the Salesforce Integration user license, like Visualforce page access, which will throw an error if you try to assign it to the user.
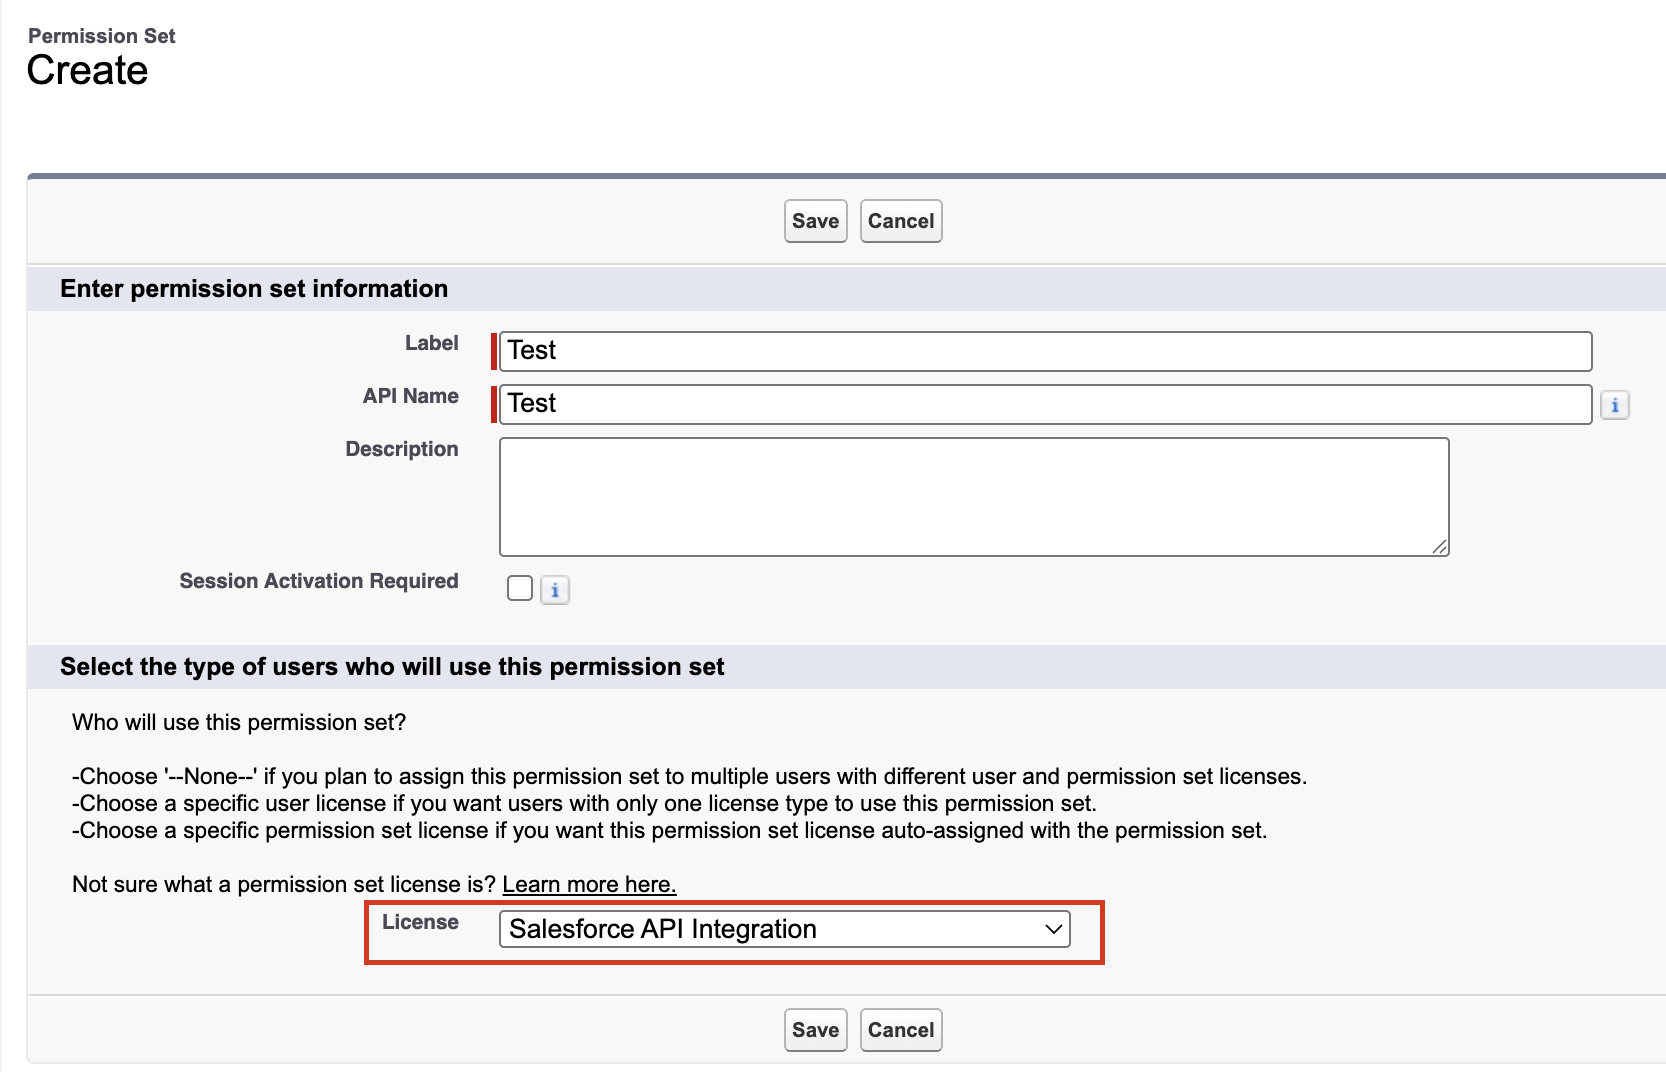
NOTE: You want to choose “Salesforce API Integration” here. DO NOT choose the “Salesforce Integration” license type when creating the permission set. That’s actually for something else and many of the permissions you’ll probably want to select won’t be available. If you find that confusing, I don’t blame you!
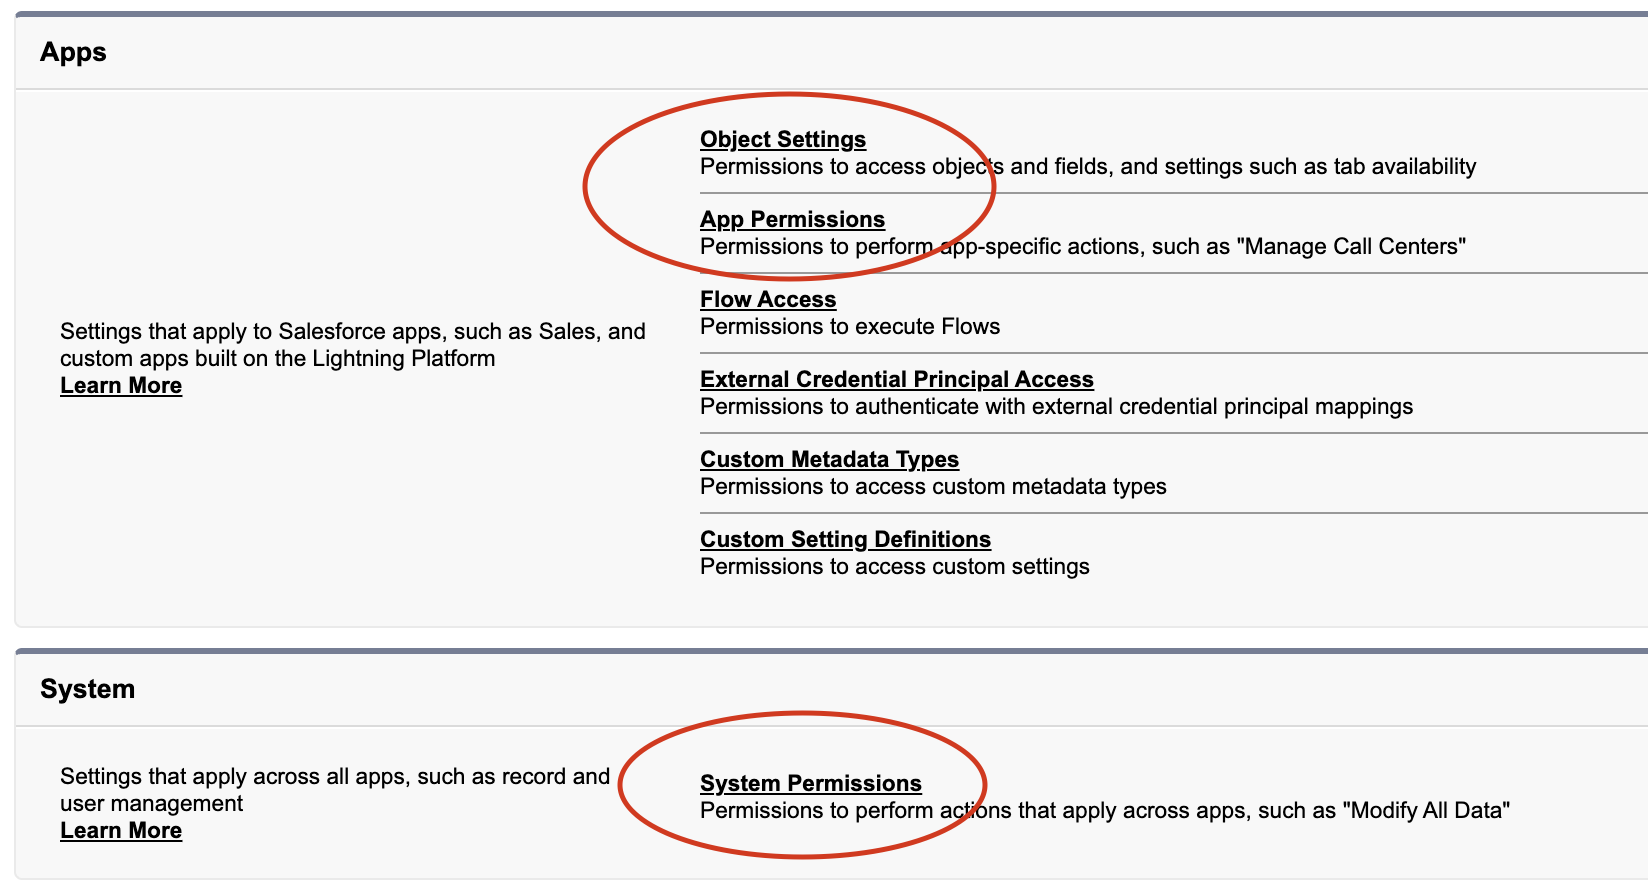
Next, you’ll need to add the required permissions to the permission set. For the Marketo integration for example, this means checking a lot of boxes in Object Settings, App Permissions, and System Permissions. Ignore their instructions to create a custom profile—we’re one of the cool kids, so we’ll be using a permission set.
The Marketo integration will need access to various fields on the Lead, Contact, Account, Campaign, Campaign Member, and Opportunity objects (depending on your use cases), as well as any custom objects you want to leverage in your integration. Here is where you can grant that access, and decide which things it can read vs write.
If you’re replacing the integration’s existing user, now is a good time to bring up the existing user’s profile in another tab or window, and compare permissions side-by-side. Make sure you aren’t leaving out anything important—that’s a great way to end up with sync errors. Or, if you’ve hired an agency with an experienced Salesforce architect (cough, cough), we can use VS Code to copy permissions from the existing user’s profile to a permission set en masse!
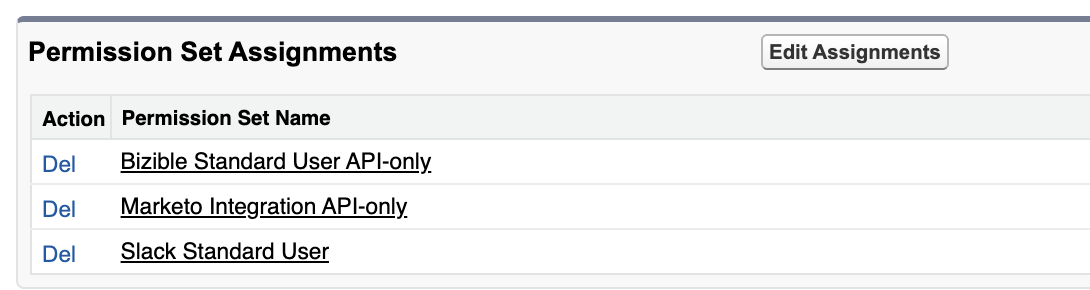
Lastly, don’t forget to assign the permission set to your user. There are multiple places to do this. For example, view the user and scroll down to Permission Set Assignments:
Edit the profile
Depending on the configuration of your org, you’ll need to edit a couple things on the “Minimum Access – API Only Integrations” profile. Exercise caution if that profile is already in use by other integrations — if you don’t want to make the same changes to those other integrations, you’ll need to clone the profile and use the clone instead.
- Task and event fields: for whatever reason, task and event field access can not be set in a permission set, so you’ll need to edit the profile’s field-level permissions to task and event fields to make sure it can see all standard fields on those objects.
- Record types: If your Salesforce org has record types for any of the objects that Marketo needs to create (the Lead object, especially), then you’ll need to edit the profile to assign a default record type for that object. This can’t be set in a permission set. The Marketo integration, for example, will throw an error when trying to create the record in Salesforce. In order to actually see record type settings when editing a profile, you might need to temporarily disable a feature called Enhanced Profile User Interface (in Setup > User Management Settings).
Connect the user to your other system
Now you’re ready to connect the new user in the integrated system! We again recommend using an incognito window to do this, as the OAuth 2.0 popup will open in your browser, and once logged in there’s not an easy way to log out.
If the integrated system isn’t set up to use OAuth, and instead is still relying on the old password/security token combination for login, now is a good time to upgrade. Here’s what this looks like in Marketo, for example:
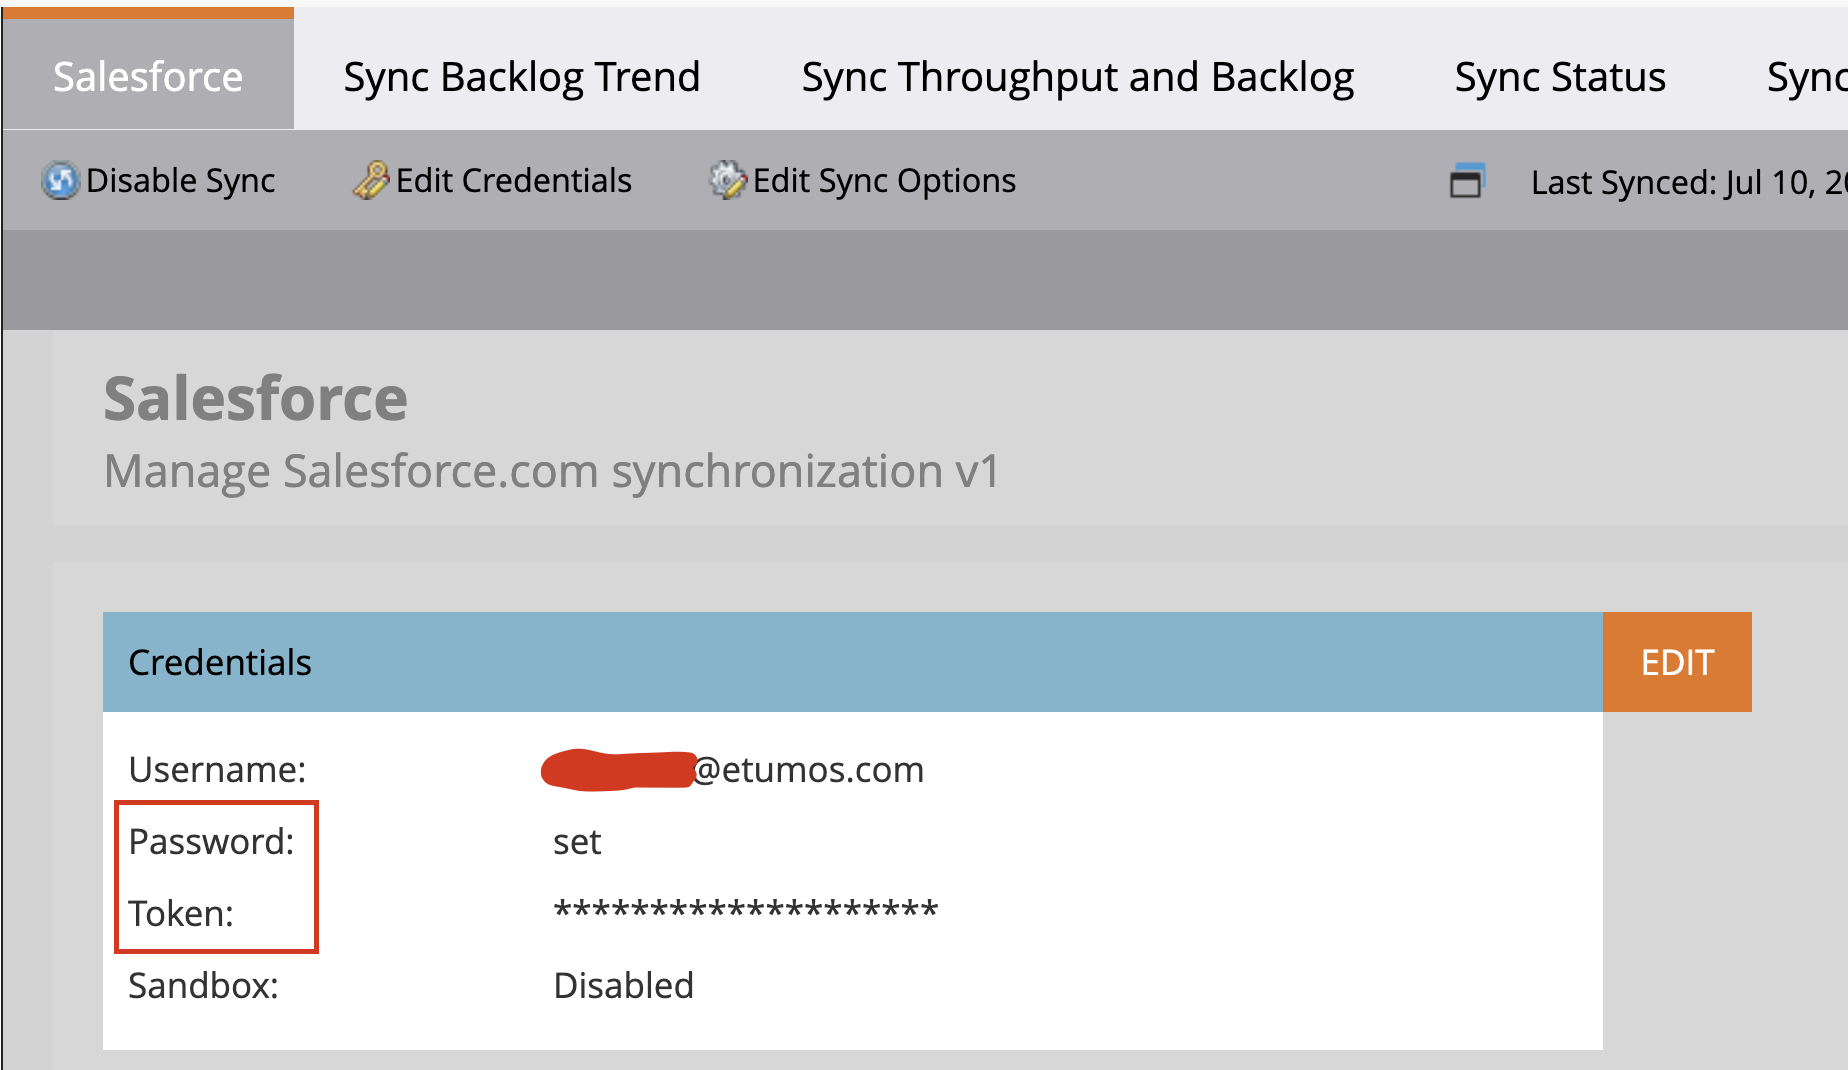
For Marketo, as an example, if you have an older instance you’ll need to reach out to Marketo Support in order to enable OAuth 2.0 for the Salesforce integration, and coordinate when that happens: it will break the integration and you’ll need to be ready with the new user’s credentials so you can reconnect Marketo quickly and get the sync working again!
Other considerations for Salesforce Integration Licenses
When evaluating whether or not a Salesforce Integration license is appropriate, there are a few things to keep in mind:
The user is truly api-only
If an integration (like LeanData, which runs in Salesforce) requires you to log in to the Salesforce integration and do something inside the Salesforce UI, you won’t be able to use a Salesforce Integration license.
Connected apps are recommended
Depending on the requirements of the integrated system, you may also need to go through the trouble of creating a connected app. This is generally considered more secure than just using Username/Password when logging in with OAuth 2.0. Refer to the documentation of the particular integration for how to set up the necessary connected app, if required.
Available permissions might not match documentation
Most documentation out there does not include this license type yet, so it may be confusing. For example, because users with this license type are API Only, it assumes the user will need API access, and thus the API Enabled permission is inherent to the license type. You won’t be able to find an “API Enabled” permission in the permission set because it’s already built-in!
Not all permissions are compatible with Salesforce Integration license permission sets
There may be other permissions which an integration requires but—for whatever reason—are not available in a permission set with the Salesforce API Integration license type. You may need to add an additional permission set with no license type set, or even modify the profile instead (or create a custom profile).